This post may contain affiliate links. If you make a purchase through these links, we may earn a commission at no additional cost to you.
Have you ever looked at amazing digital illustrations online and wondered how artists create those crisp, dynamic lines? It often starts with the humble pen – but in the digital world, that pen connects to your computer. Pen drawing on a PC for digital art opens up a world of creative possibilities, letting you refine, experiment, and share your work like never before. It might seem intimidating at first, especially if you’re used to traditional tools. But with the right gear, software, and techniques, you can translate your drawing skills into stunning digital masterpieces.
This guide will walk you through everything you need to know, from picking your first drawing tablet to mastering digital inking techniques. We’ll break down the technical stuff, explain why certain tools matter, and give you practical tips to improve your digital line art. Whether you’re a complete beginner or looking to smooth out your digital workflow, you’ll find valuable insights here. Let’s dive into how you can start creating incredible digital art with a pen and your PC.
Why Go Digital for Pen Drawing?
Switching from traditional pen and paper to a digital setup might feel like a big leap. You might wonder, “Why bother?” The truth is, digital pen drawing offers some incredible advantages that traditional methods just can’t match. It’s not about replacing your sketchbook; it’s about adding powerful tools to your creative arsenal.
One of the biggest benefits is flexibility. Made a mistake? Hit undo. Want to change the thickness of a line you drew five minutes ago? You often can, especially if you’re using vector layers (more on those later). This non-destructive workflow means you can experiment freely without worrying about ruining your artwork. You can easily erase, resize, move elements, and adjust colors or opacities without starting over. This saves a ton of time and reduces frustration, letting you focus more on the creative process itself.
Another major plus is efficiency. Digital tools allow for quick iteration. You can duplicate layers to try different inking styles, easily clean up sketches, and share your work instantly online. Coloring is a breeze once your line art is done, as you can select areas based on your lines. Plus, you don’t need to worry about scanning, dealing with dust or smudges, or running out of ink or paper. Everything is stored neatly on your computer, making organization simpler.
Digital art also offers unique capabilities. Features like brush stabilization help create smoother lines than you might achieve traditionally. Pen pressure sensitivity allows for natural line variation, mimicking the feel of traditional pens or brushes. You can use an infinite variety of brush types, textures, and effects that would be impossible with physical media. Want a brush that looks like a rough pencil, a fine-liner, or a broad marker? Digital software has you covered, and you can even create your own.
Comparing it directly, traditional pen drawing gives you that tactile feel of pen on paper, the smell of ink, and the unique, often unpredictable beauty of physical media. Digital drawing, while different, offers unparalleled control, flexibility, and a vast array of tools. It’s a different experience, but one that allows for incredible precision and creative freedom, especially for line-focused art like comics, manga, illustration, and concept art.
Essential Gear: Drawing Tablets for PC
To start pen drawing on your PC, you’re going to need a drawing tablet. This is the primary tool that replaces your traditional pen and paper, allowing you to draw directly into your computer. Drawing tablets come in various shapes, sizes, and types, and choosing the right one is a crucial first step. Don’t worry, you don’t necessarily need the most expensive model to get started.
Understanding Drawing Tablet Types
There are two main types of drawing tablets you’ll encounter:
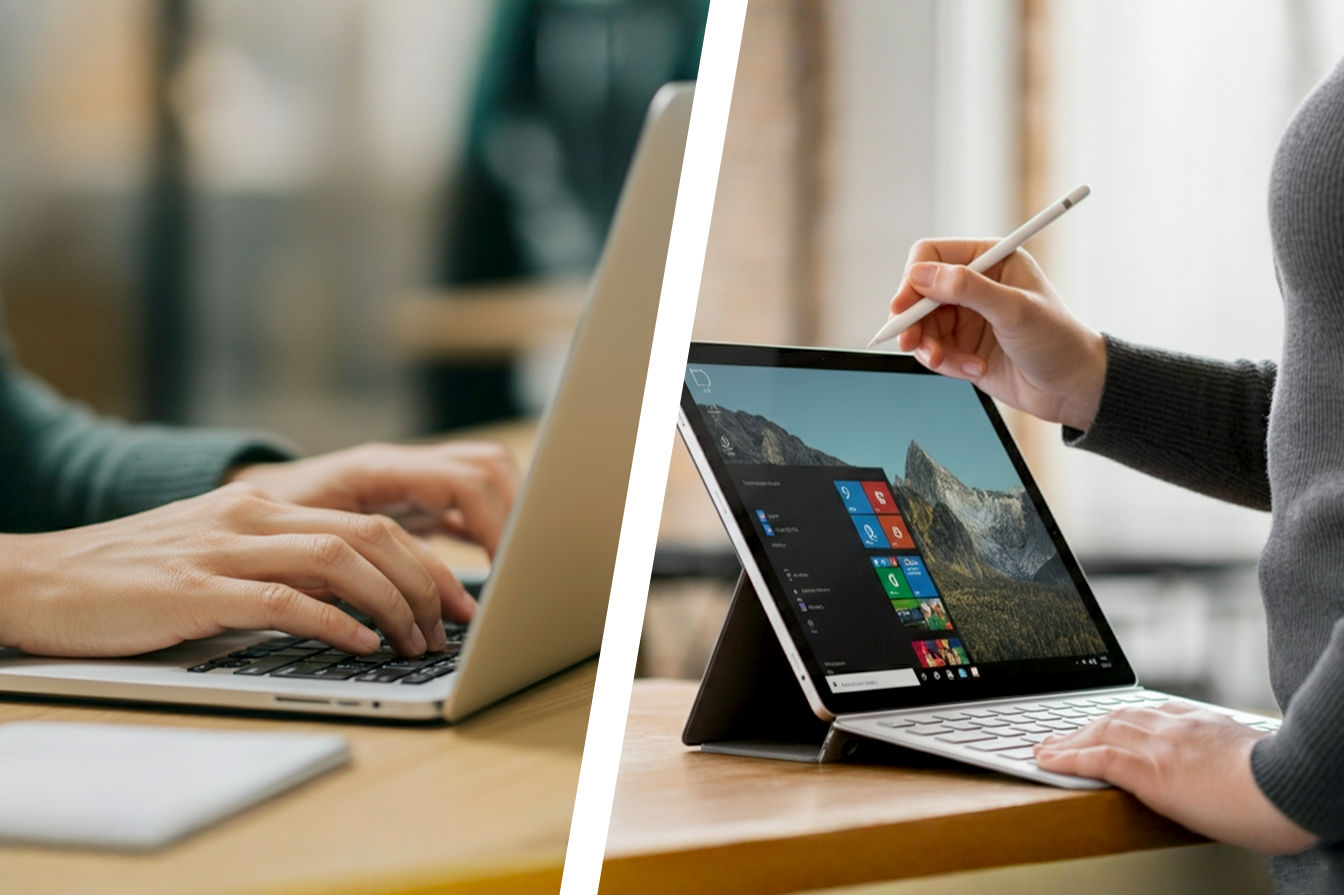
- Pen Tablets (or Graphics Tablets): These are flat, opaque pads that connect to your computer. You draw on the surface of the tablet while looking at your computer monitor. The cursor on your screen mirrors the position of your pen on the tablet. This type requires some hand-eye coordination practice because you’re not drawing directly where you’re looking. However, they are generally more affordable and durable. Think of it like using a high-tech touchpad with a pen instead of your finger.
- Pen Displays (or Interactive Pen Displays): These tablets have a screen built into them. You draw directly on the surface of the screen, much like drawing on paper, and see your artwork appear right under your pen tip. This offers a more intuitive and natural drawing experience, especially for those transitioning from traditional art. However, pen displays are typically more expensive than pen tablets and require connecting to your computer for processing power.
For beginners, a pen tablet is often a great starting point due to its lower cost. Many professional artists still use pen tablets for their work. If your budget allows and you prefer a more direct drawing experience from the start, a pen display is an excellent choice.
Key Tablet Features Explained
When looking at drawing tablets, you’ll see several specifications listed. Understanding these features will help you choose a tablet that suits your needs and budget:
- Active Area: This is the usable drawing surface on the tablet. It’s usually measured in inches (e.g., 6×4 inches, 10×6 inches). A larger active area can feel more natural, especially if you make broad strokes from your shoulder, but it also takes up more desk space and costs more. Smaller tablets are more portable. Consider your drawing style and available desk space. A medium size (around 10×6 inches) is often a good balance for many artists.
- Pressure Sensitivity: This is one of the most critical features for digital drawing. It determines how the thickness or opacity of your lines changes based on how hard you press the pen tip onto the tablet surface. Most modern tablets offer 8192 levels of pressure sensitivity. This high number means the tablet can detect very subtle differences in pressure, allowing for smooth, natural line variation, just like using a traditional pen or brush. Lower pressure levels (like 2048 or 4096) are still usable, but 8192 is the current standard for professional-feeling line work.
- Tilt Support: Some pens and tablets support tilt detection. This means the tablet can sense the angle at which you’re holding the pen. Software can use this information to change the shape or behavior of the brush, mimicking techniques like shading with the side of a pencil or using a calligraphy pen. While not strictly necessary for basic line art, tilt support adds another layer of expressiveness.
- Express Keys and Touch Rings: Many tablets include programmable buttons (express keys) and sometimes touch rings or dials on the tablet itself or the pen. You can customize these to perform common actions like undo, zoom, change brush size, or switch tools without needing to use your keyboard. This can significantly speed up your workflow. Having a few express keys can be very helpful, but too many might be overwhelming initially.
Choosing Your First Tablet
With so many options, picking your first tablet can feel daunting. Here’s a simple approach:
- Determine Your Budget: Drawing tablets range from under $50 to several hundred or even thousands of dollars. Set a realistic budget first.
- Consider Your Needs: Are you just starting out and want to try digital drawing? A smaller, more affordable pen tablet is likely sufficient. Are you a traditional artist looking for a seamless transition? A pen display might be worth the investment if your budget allows. Do you need portability? Look at smaller tablets or even some standalone tablet computers (like iPads or Surface Pros, though these are different from dedicated drawing tablets).
- Read Reviews: Look for reviews from other artists, focusing on aspects like pen feel, driver stability, and build quality.
- Popular Recommendations: Brands like Wacom, Huion, and XP-Pen are popular and offer a range of tablets at different price points. Wacom is often considered the industry standard, known for quality and reliable drivers, but Huion and XP-Pen offer excellent value, especially for beginners and intermediate users. For a first pen tablet, models like the Wacom Intuos or Huion Inspiroy series are often recommended. For a first pen display, the Huion Kamvas or XP-Pen Artist series are popular choices that are more budget-friendly than Wacom Cintiqs.
Remember, the tablet is a tool. While a good tablet can enhance your experience, your artistic skill and understanding of digital techniques are more important than having the most expensive gear. Start with something that fits your budget and needs, and you can always upgrade later.
Software Power: Picking the Right Program
Once you have your drawing tablet, you’ll need software to actually create your digital art. The right software is just as important as the hardware. Different programs offer different features, workflows, and brush engines. For pen drawing, specifically line art and inking, certain features are particularly valuable.
Must-Have Software Features for Digital Inking
When choosing software for digital pen drawing and inking, keep an eye out for these key features:
- Brush Stabilization: This is a crucial feature for achieving smooth, clean lines, especially if your hand is a bit shaky or you’re drawing long curves. Stabilization works by slightly delaying and averaging your pen input, smoothing out any wobbles. Most good drawing software includes adjustable stabilization settings, often called “Correction,” “Stabilizer,” or “Smoothness.” You can typically control the level of stabilization, from none at all to a high setting that almost draws the line for you. Experimenting with this setting is key to finding what feels right for your drawing style.
- Vector Layers: This is a powerful feature, particularly for line art. Unlike standard raster layers (which are made of pixels), vector layers store lines as mathematical paths. This means you can resize, transform, and edit vector lines without losing quality. You can easily adjust the thickness of a line, change its curve, or even erase parts of intersecting lines cleanly. This is incredibly useful for making revisions or preparing line art for different output sizes (like for print or animation). Not all software supports vector layers, but if line art is your focus, it’s a feature worth seeking out.
- Layer Management: Digital art is built on layers. Layers allow you to separate different elements of your artwork (e.g., sketch, line art, colors, background) onto transparent sheets. This makes editing incredibly flexible. You can work on your line art layer without affecting the sketch layer below it, or try out different coloring schemes on layers beneath your line art. Good software provides easy ways to create, delete, reorder, group, and adjust the opacity and blending modes of layers.
- Pen Pressure and Tilt Support: The software needs to fully support the pressure and tilt capabilities of your drawing tablet. This allows you to control brush size, opacity, or other parameters based on how you use your pen, giving your lines a natural, dynamic feel.
- Customizable Brushes: The ability to adjust existing brushes and create your own is essential. You’ll want control over brush shape, size, texture, spacing, and how it responds to pressure and tilt. A wide variety of brush options lets you mimic different traditional media or create unique digital looks.
Popular Drawing Software for PC
Several excellent software options are available for digital drawing and inking on PC. Some are industry standards, while others are more specialized or budget-friendly:
- Adobe Photoshop: Often considered the industry standard for digital painting and image manipulation. Photoshop has robust brush engines and excellent layer management, making it suitable for inking. However, it primarily works with raster graphics, meaning line art is pixel-based and can lose quality if scaled up significantly. It’s a subscription-based software, which can be a drawback for some.
- Clip Studio Paint (formerly Manga Studio): This software is specifically designed for illustration, comics, and manga, making it exceptionally strong for line art and inking. It has one of the best brush engines for simulating traditional pen and brush strokes, excellent stabilization features, and crucially, robust support for vector layers. It also includes tools for creating comic panels, adding text, and even basic animation. Clip Studio Paint is available for a one-time purchase or a monthly subscription. Many professional comic artists and illustrators use it for their line work.
- Krita: A powerful, free, and open-source painting program. Krita was created by artists and has a fantastic brush engine, good stabilization, and layer management. It’s a great option if you’re looking for a zero-cost entry into digital painting and inking. While it supports vector layers, its vector tools are generally considered less robust than Clip Studio Paint’s.
- Autodesk Sketchbook: Another excellent free drawing application that offers a clean interface and a good set of drawing tools, including decent brush stabilization and pressure sensitivity support. It’s very user-friendly and a great starting point for beginners.
- Corel Painter: Known for its realistic simulation of traditional media, Corel Painter offers a wide variety of brushes that mimic oils, watercolors, pastels, and more. While great for painting, its inking tools might feel different from software specifically designed for line art. It’s a paid software with a focus on painterly styles.
When choosing software, consider your primary focus (inking, painting, comics), your budget, and try out free trials or free software options to see which interface and brush engine feel best to you. Many artists use a combination of software for different parts of their workflow.
Free vs. Paid Software Options
The choice between free and paid software depends on your budget and needs.
Free Software (Krita, Autodesk Sketchbook, GIMP):
- Pros: No cost barrier to entry, great for beginners to learn the basics, powerful enough for many tasks.
- Cons: May lack some advanced features found in paid software (like robust vector tools or specific comic creation features), community support might be less extensive, updates might be less frequent or predictable.
Paid Software (Photoshop, Clip Studio Paint, Corel Painter, Affinity Photo/Designer):
- Pros: Often have more advanced features, industry-standard workflows, dedicated support, regular updates, extensive tutorials and resources available.
- Cons: Requires an upfront cost or ongoing subscription, can be more complex for beginners to learn.
For dedicated digital inking and line art, Clip Studio Paint is often highly recommended, even the lower-cost “Pro” version. If budget is a major constraint, Krita and Autodesk Sketchbook are excellent free alternatives that provide solid inking capabilities.
Mastering Digital Inking Techniques
Transitioning from traditional pens to a digital stylus requires adapting some techniques and learning new ones. While the core principles of line weight, hatching, and cross-hatching remain the same, the tools you use behave differently. Understanding how to leverage digital features is key to creating stunning digital line art.
Understanding Digital Brush Settings
Digital brushes are incredibly versatile. They aren’t just a fixed tip; they are complex sets of parameters that determine how your line appears. Key settings include:
- Shape: This defines the basic form of the brush tip (e.g., circle, square, textured shape).
- Size: The thickness of the line. This can often be controlled by pen pressure.
- Opacity: How transparent or solid the line is. This can also be controlled by pressure, allowing for subtle fades.
- Flow: Similar to opacity, but often controls how quickly paint is laid down as you draw.
- Spacing: The distance between the brush shape dabs that make up the line. Close spacing creates a solid line; wider spacing can create a dotted or dashed effect.
- Texture: Applying a texture to the brush can mimic the feel of traditional paper or add unique patterns to your lines.
Experimenting with these settings is crucial. Don’t just stick with the default brushes. Tweak them or download/create new ones to find what works best for your style.
Harnessing Pen Pressure and Tilt
Pen pressure sensitivity is your best friend for dynamic line art. It allows you to vary the thickness and opacity of your lines naturally as you draw. Pressing harder can create thicker, darker lines, while a lighter touch yields thinner, softer strokes. This is essential for conveying form, depth, and emphasis.
- Line Weight Variation: Use varying pressure to create lines that swell and taper. Thicker lines in the foreground or on the undersides of objects can help create a sense of depth and weight. Thinner lines can be used for details or areas receding into the background.
- Opacity Control: Pressure can also control opacity. This is useful for creating subtle shading or building up tones with multiple strokes, similar to how you might layer ink washes traditionally.
Tilt support, if your tablet and software have it, adds another dimension. You can set brushes to respond to the angle of your pen, allowing for broader strokes when the pen is tilted or fine lines when held upright. This is particularly useful for calligraphic styles or simulating flat-tipped markers.
Make sure your tablet drivers and software are correctly configured to recognize pen pressure and tilt. Sometimes, a quick check of the tablet settings or software brush dynamics panel is needed if pressure isn’t working as expected.
Working with Layers for Line Art
Layers are fundamental to digital art workflows. For line art, they offer immense flexibility:
- Sketch Layer: Keep your initial sketch on a separate layer. Once you start inking, you can reduce the opacity of the sketch layer or hide it entirely. This keeps your line art clean and makes it easy to refer back to your original drawing.
- Line Art Layer(s): Create one or more layers specifically for your line art. You might use separate layers for different elements (e.g., characters on one layer, background on another) or for different line weights. This allows you to edit each set of lines independently.
- Color Layers (Below Line Art): Place your coloring layers below your line art layer. This way, your colors won’t cover up your carefully drawn lines.
- Reference Layers: Import reference images onto their own layers. You can move, resize, and adjust the opacity of these layers without affecting your artwork.
Using layers effectively keeps your project organized and makes revisions much easier. It’s a core concept in digital art that takes a little getting used to but quickly becomes indispensable.
Vector vs. Raster Line Art: Which to Use When?
Understanding the difference between vector and raster graphics is important for digital inking:
- Raster Graphics: These are made up of a grid of pixels (tiny colored squares). JPEGs, PNGs, and GIFs are common raster formats. Software like Photoshop primarily works with raster images. When you draw on a raster layer, you are essentially changing the color of pixels. The technical detail: Each pixel has a specific color value. When you draw a line, the software changes the color of the pixels along that path. If you scale a raster image up significantly, the pixels become visible, and the image appears blocky or pixelated.
- Pros for Line Art: Can capture subtle textures and gradients easily, widely compatible.
- Cons for Line Art: Loses quality when scaled up, difficult to edit line thickness or shape precisely after drawing.
- Vector Graphics: These are made up of mathematical equations that define points, lines, curves, and shapes. Software like Adobe Illustrator or features like vector layers in Clip Studio Paint work with vector graphics. The technical detail: Instead of storing pixel colors, vector graphics store information about the path of a line (e.g., its starting point, ending point, curvature, thickness, and color). When you scale a vector graphic, the software recalculates the math, redrawing the line perfectly at the new size.
- Pros for Line Art: Scalable without losing quality, easy to edit line thickness, shape, and color, clean and crisp lines.
- Cons for Line Art: Can be less suitable for highly textured or painterly lines, not all software supports them robustly.
For line art that needs to be scaled or edited frequently (like logos, illustrations for print, or comic panels), using vector layers is highly recommended. For more painterly or textured line work, or if you’re primarily working in software like Photoshop, raster layers are perfectly fine. Many artists use a hybrid approach, doing their line art on vector layers and then adding color and effects on raster layers.
Common Digital Inking Styles
Just like with traditional inking, you can develop different styles digitally:
- Clean Line Art: Characterized by smooth, consistent lines with deliberate variations in thickness to define form and depth. Often uses minimal hatching or stippling. Software features like high stabilization and vector layers are great for this style.
- Sketchy Lines: Embraces a more loose, energetic feel with visible overlapping strokes and less emphasis on perfect smoothness. Lower stabilization settings or brushes with texture can help achieve this.
- Varying Line Weight: A fundamental technique used in most styles. Consciously changing the thickness of your lines to indicate light sources, material properties, or proximity. Pressing harder or lighter with your pen is key here.
- Hatching and Cross-Hatching: Using parallel or crossed lines to create areas of shadow and tone. Digitally, you can use brushes designed for hatching or manually draw the lines. Layers can be useful for keeping hatching separate from your main lines.
- Stippling: Creating tonal areas using dots. Denser dots create darker areas. This is achievable digitally using dot brushes or by manually placing dots.
Experiment with these techniques and see how different brushes and settings affect the outcome. Digital tools make it easy to try out different styles quickly.
Using Stabilization for Smoother Lines
As mentioned earlier, stabilization is a game-changer for digital inking. If you find your lines are wobbly or jagged, increasing the stabilization setting in your software is the first thing to try.
How it works (Simplified): When you draw a line, the software receives a stream of data points from your tablet indicating the pen’s position. Without stabilization, the software connects these points directly. With stabilization, it analyzes a small group of recent points and calculates a smoother path between them before drawing the line on screen.
How it works (Technical): Stabilization algorithms often use techniques like averaging or interpolation. A common method is “lagged smoothing,” where the drawn line trails slightly behind your actual pen movement. The degree of lag and averaging determines the strength of the stabilization. Higher settings introduce more lag but result in significantly smoother lines.
Find the stabilization setting in your software’s brush options or preferences. Most programs let you adjust it with a slider or numerical input. Start with a moderate setting and increase it if your lines are still too shaky. Be aware that very high stabilization can make drawing fast, sharp strokes more difficult due to the lag. It’s about finding a balance that suits your drawing speed and desired line quality.
From Sketch to Stunning Line Art: The Digital Workflow
Creating digital line art involves a series of steps, much like traditional inking, but adapted for the digital environment. Having a clear workflow can help you stay organized and efficient.
Setting Up Your Canvas and Workspace
Before you start drawing, set up your digital canvas:
- Choose Your Software: Open your preferred drawing program.
- Create a New Document: Specify the dimensions (width and height) and resolution (DPI – dots per inch) of your canvas. For print, a resolution of 300 DPI is standard. For web or screen display, 72 DPI is usually sufficient, but working at a higher resolution initially gives you more flexibility if you decide to print later. Choose dimensions that fit your intended output or are large enough to allow for detail.
- Set Up Your Workspace: Arrange your software panels (layers, brushes, tools) in a way that feels comfortable and efficient. Customize your express keys on your tablet for frequently used actions like Undo, Redo, Zoom, and Brush Size.
Sketching Digitally or Scanning Traditional Sketches
You have two main options for the initial sketch phase:
- Sketching Digitally: Create a new layer in your software and sketch directly using a digital pencil or brush. This keeps your entire process digital from the start. You can easily erase and refine your sketch on this layer.
- Scanning Traditional Sketches: If you prefer the feel of sketching on paper, create your sketch traditionally. Then, scan or take a high-quality photo of your sketch and import it into your digital art software. Place the scanned sketch on a layer, reduce its opacity, and use it as a guide for your digital inking on a new layer above it.
Choose the method that feels most comfortable for you. Both are valid approaches.
The Inking Process: Laying Down Clean Lines
This is where you create your final line art.
- Create a New Layer for Inking: Always ink on a new layer above your sketch layer. If you’re using vector layers, create a new vector layer.
- Select Your Brush: Choose an inking brush that suits your desired style (clean, textured, etc.). Adjust the size, pressure sensitivity settings, and stabilization.
- Start Drawing: Carefully draw over your sketch lines. Focus on varying your line weight to add depth and visual interest. Don’t be afraid to use the undo function! Digital allows for endless correction.
- Use Layers for Different Elements: If your piece has multiple elements (characters, background, foreground), consider inking them on separate layers. This makes editing and organizing much easier.
Take your time with the inking process. Good line art is the foundation for a strong illustration.
Refining and Cleaning Up Your Line Art
Once the initial inking is done, you’ll need to refine and clean up your lines:
- Erase and Tidy: Use the eraser tool to clean up any messy lines, overshoots, or areas where lines intersect awkwardly. If you’re on a vector layer, you might have specific vector erasing tools that can clean up intersecting lines automatically.
- Adjust Line Weight: Review your line art and make adjustments to line weight where needed to improve clarity, form, and depth. This is particularly easy on vector layers where you can change the thickness of existing lines.
- Smooth Lines: If some lines still look shaky, you can use selection tools and transformation options (like warp or deform) to subtly adjust curves. Some software also has dedicated tools for smoothing lines after they’re drawn.
- Check for Gaps: If you plan to color your line art using automatic selection tools (like the magic wand or fill bucket), make sure there are no small gaps in your lines where color could “leak” out. Close any gaps using your inking brush.
A clean line art layer is essential for a smooth coloring process later on.
Advanced Tips for Pro-Level Pen Drawing
Once you’re comfortable with the basics, you can explore more advanced techniques and workflow optimizations to take your digital pen drawing to the next level.
Customizing Brushes for Unique Styles
Don’t limit yourself to the default brushes. Learning to customize brushes is a powerful way to develop a unique artistic style.
- Adjusting Existing Brushes: Dive into the brush settings panel of your software. Experiment with parameters like shape dynamics (how the brush shape changes with pressure or tilt), scattering (how brush dabs are spread), texture, and dual brushes (combining two brush tips).
- Creating New Brushes: Most software allows you to create brushes from scratch or based on existing brush tips. You can define the brush shape using grayscale images (where white is transparent and black is opaque) and set how it behaves. Want a brush that looks like a specific traditional pen you love? Try to recreate its characteristics digitally.
- Importing Brushes: Many artists and communities share custom brush sets online. Importing these can give you access to a wide variety of textures and effects created by others.
Customizing brushes allows you to fine-tune your tools to perfectly match your artistic vision and workflow.
Using Reference Images Effectively
Reference images are invaluable for accuracy and inspiration, whether you’re drawing traditionally or digitally.
- Anatomy and Pose References: Use photos or 3D models to accurately depict human or animal anatomy and challenging poses.
- Perspective and Environment References: Photos of buildings, landscapes, or objects can help you get perspective and details right in your backgrounds.
- Material and Texture References: Look at photos of different materials (fabric, metal, wood) to understand how light interacts with them and how to represent their textures with lines.
- Inspiration References: Collect images from other artists or photographs that inspire your style, composition, or mood.
In digital software, you can easily import reference images onto a separate layer, place them side-by-side with your canvas, or even use features that allow you to sample colors or textures directly from the reference. Don’t just copy; use references to understand structure and detail, then interpret it in your own style.
Speeding Up Your Workflow with Shortcuts and Express Keys
Efficiency is key, especially on larger projects. Mastering keyboard shortcuts and customizing your tablet’s express keys can dramatically speed up your workflow.
- Learn Essential Shortcuts: Identify the actions you perform most frequently (Undo, Redo, Save, Zoom, Pan, Brush Size, Eraser, Eyedropper, Layer creation/deletion). Learn the keyboard shortcuts for these in your software.
- Customize Express Keys: Map your most used shortcuts to the express keys on your drawing tablet or pen. This allows you to perform actions with your non-drawing hand without reaching for the keyboard, keeping your focus on the screen.
- Utilize On-Screen Shortcuts: Some software and tablet drivers offer on-screen shortcut menus or radial menus that pop up with a pen flick or button press, providing quick access to more commands.
Spending a little time setting up and learning these shortcuts will save you a lot of time in the long run.
Maintaining Good Posture and Ergonomics
Digital art can involve long hours sitting at a desk. Maintaining good posture and setting up an ergonomic workspace is crucial to prevent strain and injuries.
- Adjust Your Chair and Desk: Ensure your chair provides good back support and that your feet are flat on the floor. Your desk should be at a height that allows your arms to rest comfortably while drawing.
- Position Your Monitor: Place your monitor at eye level to avoid neck strain. If you’re using a pen tablet, position it comfortably in front of you. If using a pen display, adjust its angle using a stand so you’re not hunching over.
- Tablet Placement: For pen tablets, place it directly in front of your monitor to minimize the disconnect between where you draw and where you look. For pen displays, ensure the angle is comfortable for your wrist and neck.
- Take Breaks: Step away from your desk every hour or so to stretch, move around, and rest your eyes.
- Consider Ergonomic Accessories: An ergonomic mouse, keyboard, or wrist rest might be helpful if you experience discomfort.
Ignoring ergonomics can lead to repetitive strain injuries over time. Prioritizing your physical comfort will allow you to draw for longer periods without pain.
Troubleshooting Common Digital Pen Drawing Issues
Even with the right gear and software, you might occasionally run into technical glitches. Here are some common issues and how to troubleshoot them.
Addressing Pen Pressure Issues
One of the most frustrating problems is when pen pressure stops working or isn’t behaving as expected.
- Check Tablet Driver: The most common culprit is the tablet driver. Make sure you have the latest driver installed for your specific tablet model. Go to the manufacturer’s website (Wacom, Huion, XP-Pen, etc.) and download the most recent version. Uninstall any old drivers before installing the new one.
- Restart Your Computer: A simple restart can often resolve driver conflicts or software issues.
- Check Software Settings: Within your drawing software, go to the brush settings or preferences and ensure that pen pressure is enabled for the parameters you want to control (size, opacity, etc.). Sometimes, a setting might have been accidentally turned off.
- Test in Another Application: See if pen pressure works in other drawing software or even in the tablet’s own driver settings panel (most drivers have a pressure test area). If it works elsewhere, the issue is likely with your specific drawing software. If it doesn’t work anywhere, the issue is likely with the driver or the tablet/pen itself.
- Check Pen Nib: A worn-out pen nib can sometimes affect pressure sensitivity. Try replacing the nib with a new one.
- Tablet Service (Windows): On Windows, the “TabletInputService” or “Wacom Professional Service” (for Wacom tablets) needs to be running. You can check this in the Windows Services panel.
Reducing Lag and Improving Performance
If your lines appear choppy or there’s a noticeable delay between your pen movement and the line appearing on screen, you might be experiencing lag.
- Check Computer Specs: Digital art software, especially with large canvases and many layers, can be resource-intensive. Ensure your computer meets the recommended system requirements for your software. RAM (Random Access Memory) and processor speed are particularly important.
- Close Other Programs: Close any unnecessary applications running in the background that might be consuming system resources.
- Adjust Software Performance Settings: Many drawing programs have performance settings. You might be able to adjust memory usage, undo levels, or other parameters that affect performance.
- Simplify Your Brush: Complex brushes with high texture or spacing settings can sometimes cause lag. Try using a simpler brush.
- Reduce Canvas Size/Resolution: If you’re working on a massive canvas at a very high resolution, it will require more processing power. Consider if you truly need such high settings for your project.
- Update Graphics Drivers: Ensure your computer’s graphics card drivers are up to date. This can significantly impact drawing performance.
Calibration and Mapping Problems
Sometimes the cursor on your screen doesn’t align correctly with your pen on the tablet, or the mapping of the tablet area to your screen feels off.
- Recalibrate Your Pen Display: If you’re using a pen display, run the calibration utility in your tablet driver settings. This involves tapping a few points on the screen with your pen to align the cursor.
- Check Display Mapping (Pen Tablets): For pen tablets, ensure the tablet area is correctly mapped to your monitor. If you have multiple monitors, make sure the tablet is mapped to the correct display or a portion of it. This setting is found in your tablet driver.
- Check Monitor Resolution: Ensure your monitor is set to its native resolution in your computer’s display settings.
- Restart Software/Computer: Again, a simple restart can sometimes fix temporary mapping glitches.
Troubleshooting can be frustrating, but systematically checking drivers, software settings, and hardware connections will usually help you pinpoint and solve the issue.
Practice and Development: Growing Your Skills
Having the right tools is just the beginning. Like any artistic skill, mastering digital pen drawing requires practice, patience, and a willingness to learn.
Developing Your Hand-Eye Coordination
If you’re using a pen tablet (without a screen), you’ll need to develop hand-eye coordination – drawing in one place while looking at another.
- Practice Basic Strokes: Spend time drawing straight lines, curves, circles, and ellipses on the tablet while watching your monitor. Focus on making smooth, confident strokes.
- Simple Exercises: Draw basic shapes, practice hatching and stippling, and try filling areas with consistent lines.
- Start Simple: Don’t jump into complex illustrations immediately. Begin with simpler subjects to get comfortable with the tablet and software.
This coordination will become second nature with practice, just like learning to use a mouse or trackpad.
Finding Tutorials and Resources
The digital art community is vast and generous with knowledge. There are countless resources available to help you learn and improve:
- Online Tutorials: Websites like YouTube, Skillshare, Udemy, and DeviantArt offer video and written tutorials on everything from software basics to specific inking techniques.
- Software Documentation: The help files or online manuals for your drawing software are excellent resources for learning about specific tools and features.
- Artist Blogs and Websites: Many professional artists share tips, workflows, and tutorials on their own websites.
- Books: While digital resources are abundant, traditional art books on inking and drawing fundamentals are still incredibly valuable and applicable to digital work.
Actively seeking out and following tutorials is a great way to learn new techniques and workflows.
Joining Online Communities
Connecting with other digital artists can provide motivation, feedback, and learning opportunities.
- Art Forums and Websites: Websites like DeviantArt, ArtStation, and Behance have forums and community sections where you can share your work, ask questions, and get feedback.
- Social Media Groups: Facebook groups, Discord servers, and subreddits dedicated to digital art, specific software, or drawing tablets are great places to connect with others.
- Online Challenges and Events: Participate in drawing challenges (like Inktober, even digitally) or online events to push your skills and get involved with the community.
Sharing your work and seeing what others are creating can be very inspiring and help you improve.
Conclusion
Mastering pen drawing for PC and creating stunning digital art is an exciting and rewarding journey. It requires understanding the tools – your drawing tablet and software – and learning how to apply traditional drawing principles in a digital environment. We’ve covered the essential gear, the key software features for inking, specific digital techniques like using pen pressure and stabilization, and how to build an efficient workflow.
Remember that the most important ingredient is practice. Don’t get discouraged by the initial learning curve. Experiment with different brushes, software settings, and techniques. Utilize the flexibility of digital tools to refine your work and try new things. Connect with the online art community for support and inspiration.
With the right tools, a solid understanding of digital techniques, and consistent practice, you’ll be well on your way to creating incredible digital line art that truly reflects your artistic vision. So grab your digital pen, open your software, and start drawing! The digital canvas awaits.